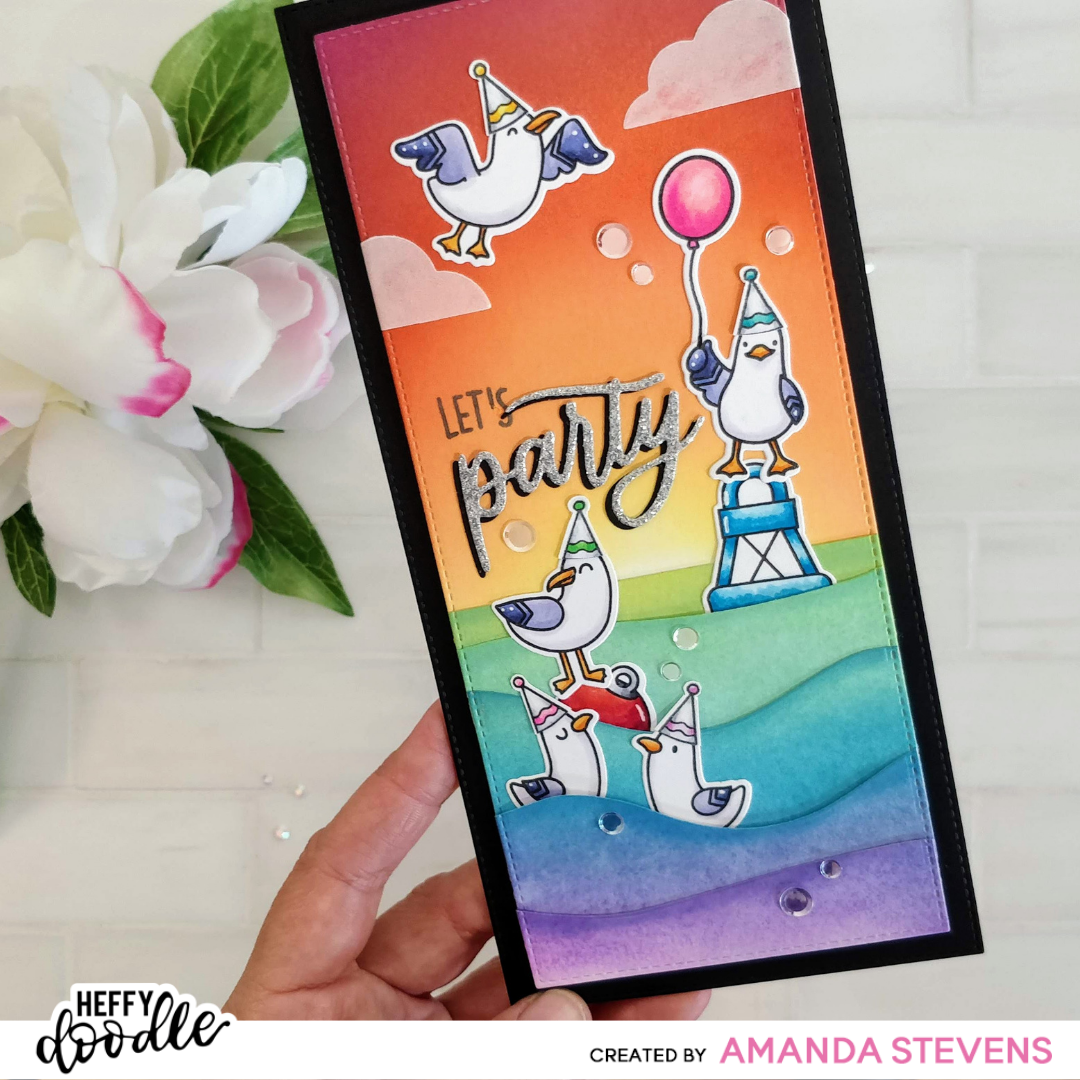
I love ocean cards. Underwater scenes, shallow water scenes, beach scenes, you name it, I love them all. I’ve made countless versions, even mermaid Christmas cards one year. But I’ve never figured out how to create a rainbow ocean scene, until this card. Turns out, it’s easy! Why didn’t I think of this before?
Let’s begin with the background. I started with two A2 panels of Bristol Smooth cardstock. On one, I ink blended my warm colors – Squeezed Lemonade, Abandoned Coral, Candied Apple, and Wilted Violet Distress Oxide inks. I started with the yellow, about an inch up from the bottom of the panel, and blended in a circular pattern, leaving a bit of white space in the center of the yellow (to create the sun). The purple ink at the top blends nicely into the red, and gives the sunset a rich, warm hue. On the second panel, I blended on Twisted Citron, Salvaged Patina, Salty Ocean, and more Wilted Violet Distress Oxide inks. I worked from the top down to create a smooth blend of the cool colors. Then, I misted the panel with water and absorbed it with a cloth, to create texture in the water.
After the cool color panel was dry, I used four hillside dies to cut the panel into five wave sections, near the color transition lines. (The horizon is a straight line, so I didn’t cut the top of the green section.) To help separate each wave, I blended a little more ink onto the top of the cut line. You don’t need much ink for this. In fact, I just used the leftover ink that was already on my brushes, without adding any more.
To merge the top sunset and the waves into a single panel, I die cut a stitched slimline rectangle from thin copy paper. Then, I used the same die to cut the top and sides of the sunset piece and glued it to the copy paper. I arranged the wave pieces on top, overlapping each other, and making sure the horizon was straight. Then, I held them together with low-tack Heffy Memo Tape, lined up the die on top, and die cut the waves. With the memo tape still in place, I flipped the waves over and applied glue to the horizon wave, sides, and bottom, before sticking them to the panel. This left me with pockets that I could later tuck the seagulls into.
By working with two panels, I was able to keep the warm and cool colors separate, and avoid muddying up the blend. It also allowed me to add texture to the water, and keep a smooth blend in the sky.
To pull the card together, I stamped and Copic colored the seagulls and buoys from Heffy Doodle’s You Go Gull stamp set. For a festive party feel, I added a balloon and party hats to the mix. Then I die cut them all with the coordinating dies. Since I was gluing the hats to the birds’ heads, I trimmed off the white border at the bottom of the hats. I also connected the line from the balloon string to the gull’s hand (wing?) with a black pen. After arranging the pieces, I stamped LET’S onto the panel, then tucked and glued everything into place. The sky felt a little bare, so I added a pair of vellum clouds. PARTY was cut from a layer of black cardstock, and another of silver glitter paper. I glued them together, slightly offset, to create a drop shadow.
The panel was popped up with foam tape onto a larger stitched slimline panel, cut from black cardstock. I glued the panel onto a slimline card base, and scattered on a few clear sequins to finish the card and add sparkle. I chose them over gems, because they mimic bubbles.
SUPPLY LIST
[row]
[column size=”1/2″ stack=”sm”]
Bristol Smooth Cardstock
Squeezed Lemonade Distress Oxide
Abandoned Coral Distress Oxide
Candied Apple Distress Oxide
Wilted Violet Distress Oxide
Twisted Citron Distress Oxide
Salvaged Patina Distress Oxide
Salty Ocean Distress Oxide
Blending Brushes
Heffy Memo Tape
[/column]
[column size=”1/2″ stack=”sm”]
You Go Gull Stamps & Dies
Bots of Love Stamps & Dies (party hat)
Elephant of Surprise & Dies (balloon)
Party Heffy Cuts Die
DL Stitched Slimline Trio Dies
Stitched Hillside Border Dies (waves)
Chimply the Best Stamps (let’s)
Extreme Black Ink
Copic Markers
[/column]
[/row]
Thanks so much for stopping by! Today’s card is the inspiration card for the July Heffy Doodlers Challenge. This month, the theme is Adventure Ahead, and I hope you are inspired to play along with us…

If you’re ready for your own adventure, pull out your Heffy Doodle stamps and create a card! To enter, go to the Heffy Doodlers Facebook Group and post a picture of your project in the July 2021 Challenge album (it will be pinned to the top). Enter as many cards as you like. The winner will be randomly chosen from all entries posted prior to Midnight (UT) on July 31, 2021. You are not limited to cards, feel free to post tags, scrapbook pages, home decor projects, etc. Just be sure the bulk of the stamps and dies used are from Heffy Doodle. Good luck my friend! All of the contest details can be found on the Heffy Doodle blog.
This site uses affiliate links whenever possible (at no additional cost to you), but only for products I actually use and love.
