
If you’re like me, you have a big stash of pattern paper that you hardly use. Often times, the patterns are too large for cards. Sometimes, they’re too busy, have the wrong colors, or have images that don’t go with any of your stamps. And sometimes, they just aren’t very pretty. Today, I want to show you a few ways stencils can help salvage some of those papers!
You can watch the process for each technique in this video, then use this blog post as a reference later, when you want to give them a try, and remember the ideas.
ALTERING TECHNIQUES
Ink Blending
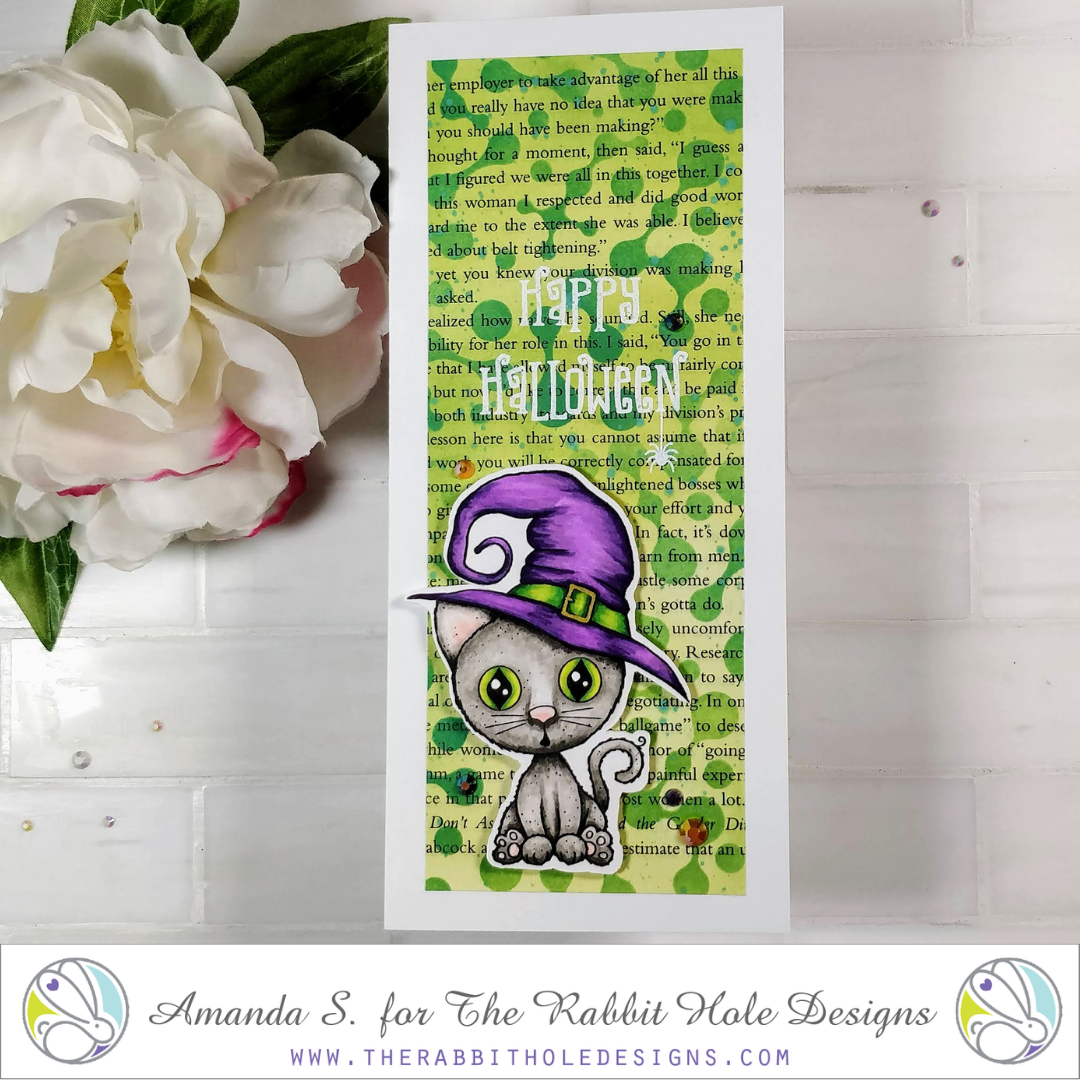
If you have a paper with the wrong colors, or not enough color, you can alter the color with ink blending. Then, stencil a design on top, to help add another layer of texture. For the sample below, I used Cotton Tail brushes to blend several shades of green ink onto a book page, before stenciling the new Weird Science pattern on top. (This stencil is designed to lineup and extend in any direction, so you can cover any size panel you want.) I stamped my sentiment, and added the adorable Boo Kitty on top for a fun Halloween card. Rainbow gems add a nice pop!
Whitewashing
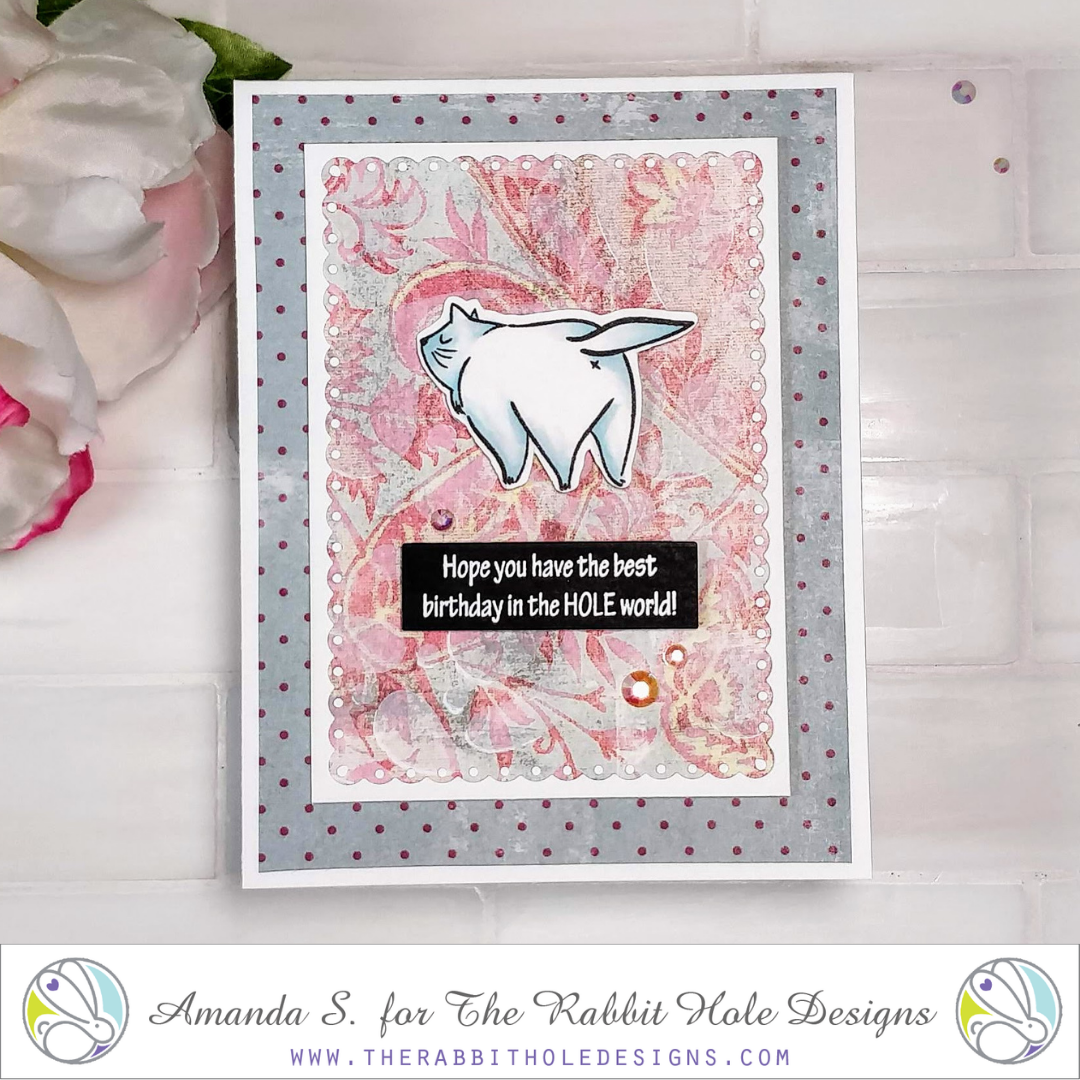
Sometimes pattern papers can be too busy, and our die cut pieces can get lost if we don’t tone down the background. Stenciling on white pigment ink can often do the trick! It tends to dry back soft and translucent. Here I stenciled white ink through the new Splish Splash stencil, so my sassy cat would pop. A pretty scalloped die, combined with the floral background, and the shimmering gems, add a hint of elegance to the card. That makes the sentiment less expected, and more outrageous.
Dry Embossing with Ink Blending
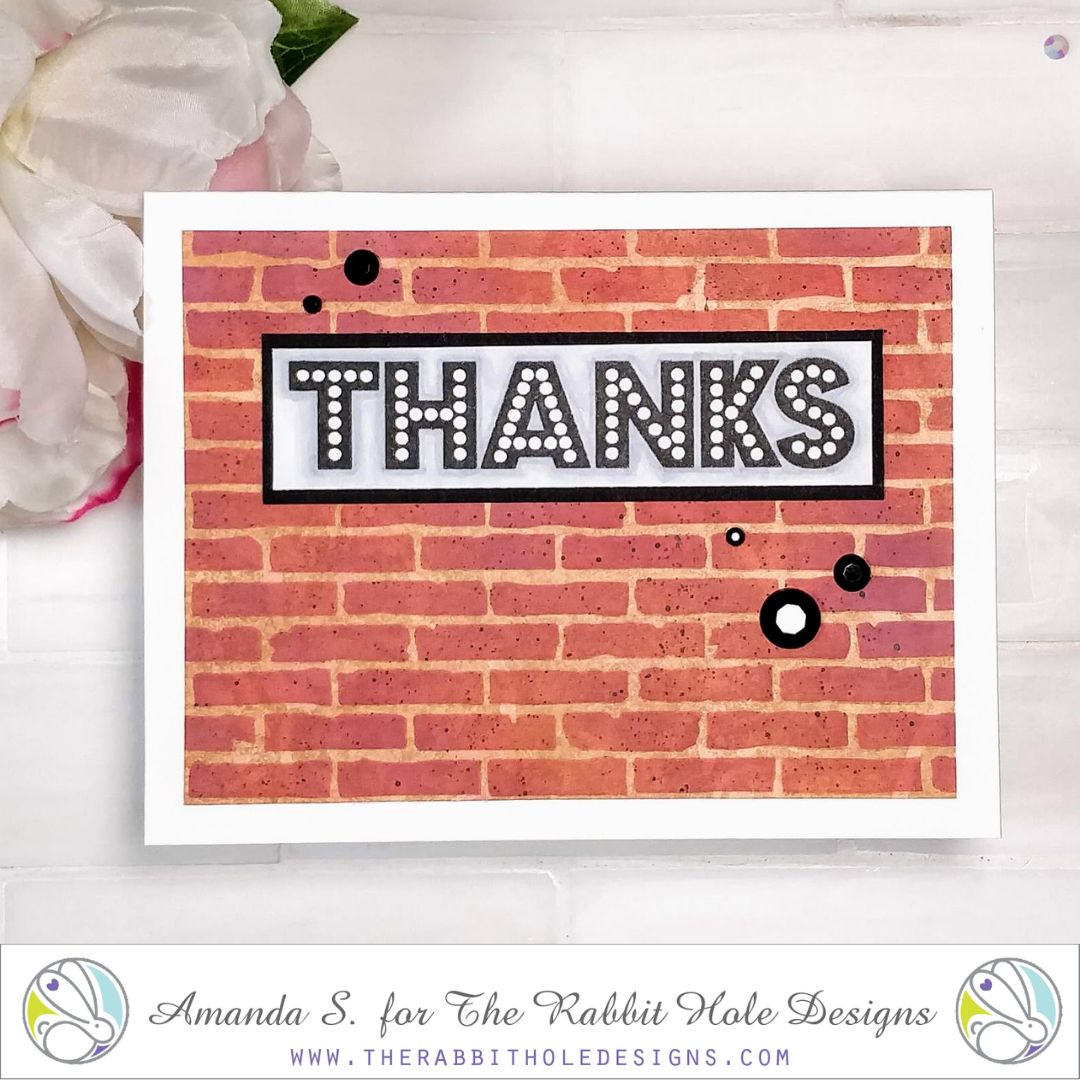
A great way to spice up boring pattern paper is to add a raised texture with dry embossing. To add more color, ink blend through the stencil after embossing. Here I jazzed up a bland tan paper with the new Back Alley stencil. I made sure not to shift my stencil after I ran it through my die cutting machine, so I could keep the pattern lined up. I used smaller blending brushes this time, to add three shades of red and orange inks to the bricks. Before I removed the stencil, I splattered thinned black ink all over. The raised texture, along with the realistic brick pattern is awesome! It was the perfect backdrop for a Marquee sign.
Wet Embossing with Ink Blending
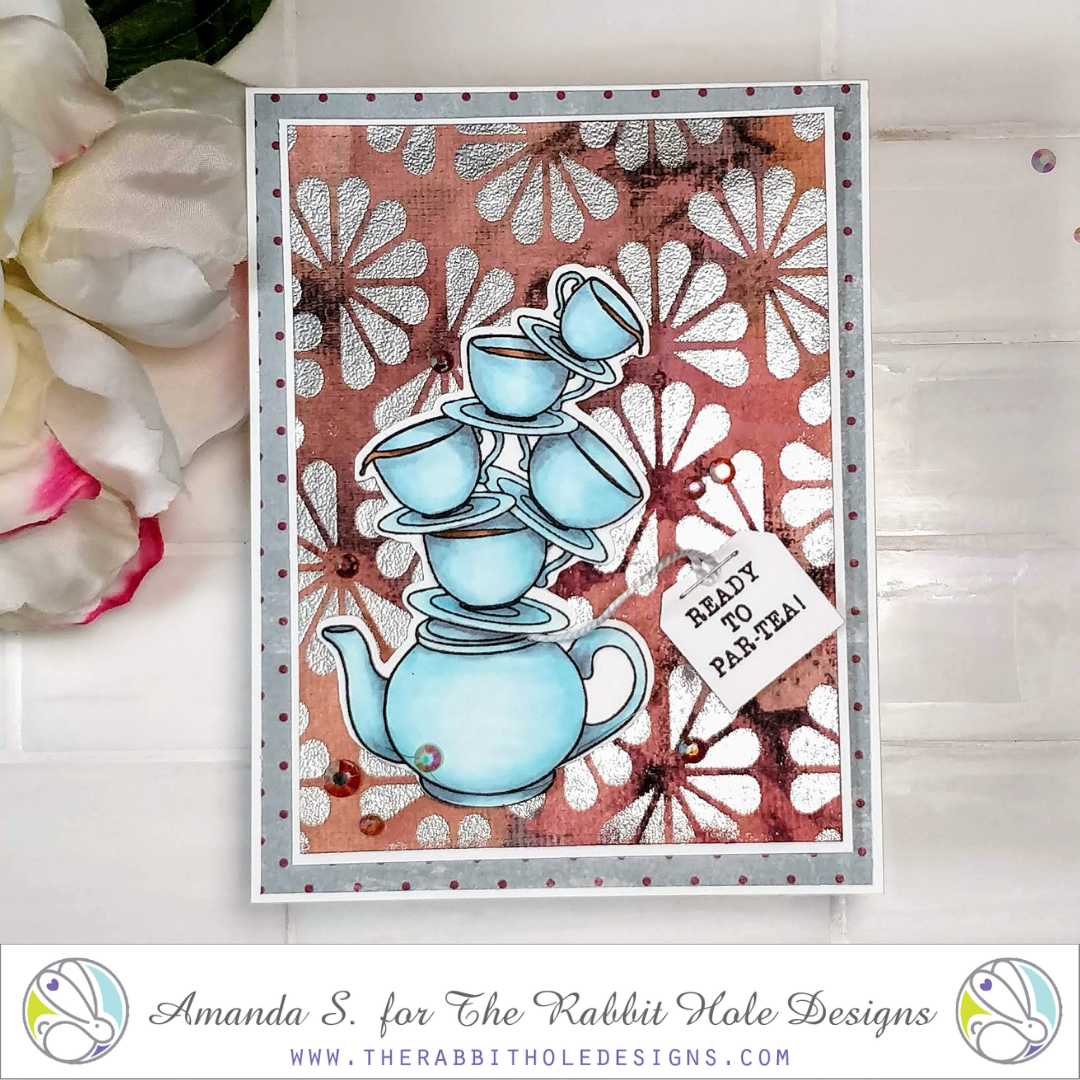
Similar to the dry embossing technique above, wet embossing will give you a raised texture. But it also gives you the opportunity to create a resist with your embossing powder. That allows you to add color to the negative area of your stencil, by ink blending after you emboss. For this sample, I pounced Versamark ink through the Twisted Sunshine stencil, then embossed with silver powder. Next, I blended a deep red ink all over the panel, and wiped the excess off the silver areas. The blue and white teapot stack and sentiment really stand out against that background!
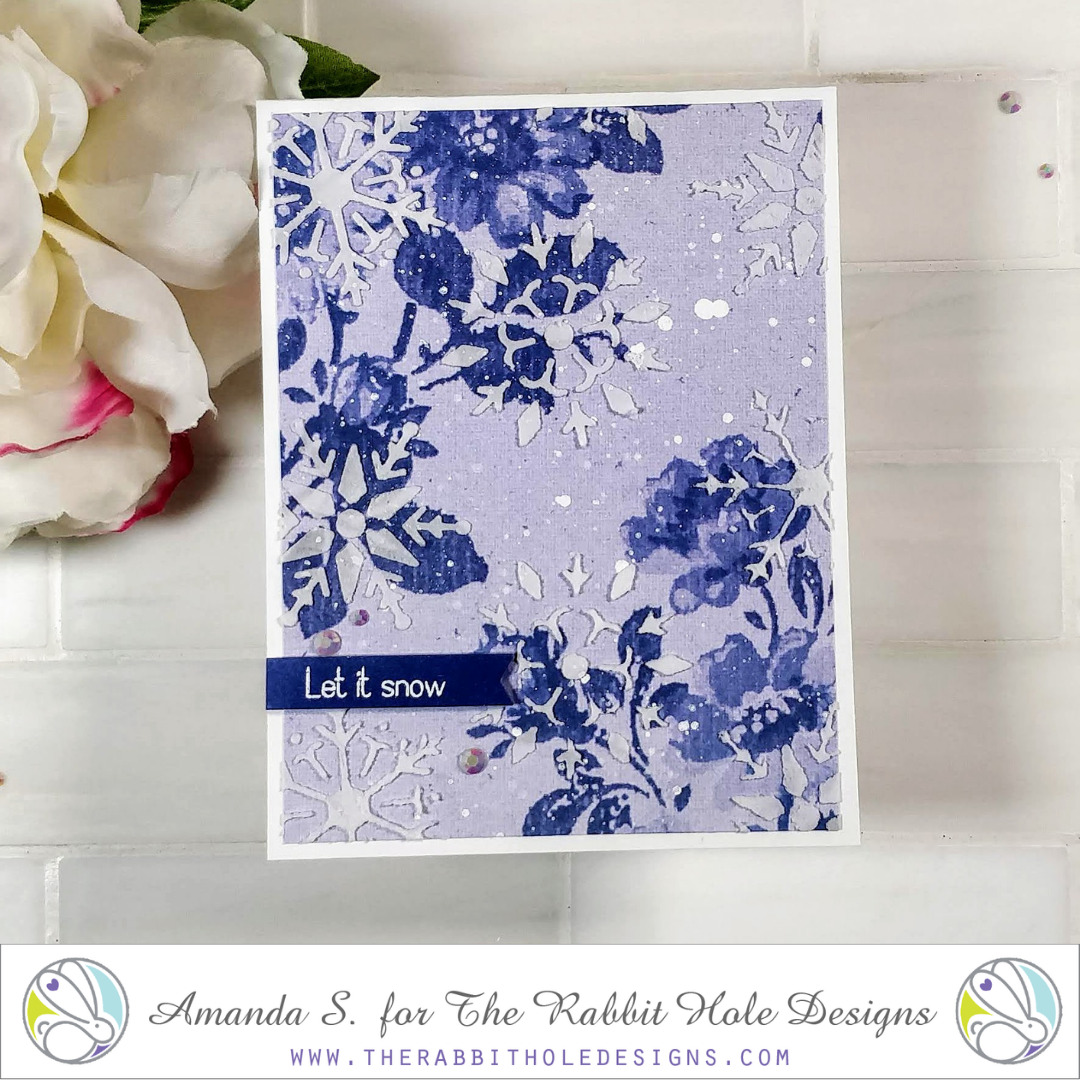
Texture Paste
Stenciling on texture paste is yet another way to get a raised surface and give your pattern paper a completely different look. Here I stenciled snowflakes from the Light Me Up stencil onto a blue floral background. To help tie the white in with the blue, and to add more snow to the scene, I splattered thinned Copic White all over the panel. A simple sentiment is all that was needed to finish this card. But I couldn’t help myself; I added a few sparkly gems too.
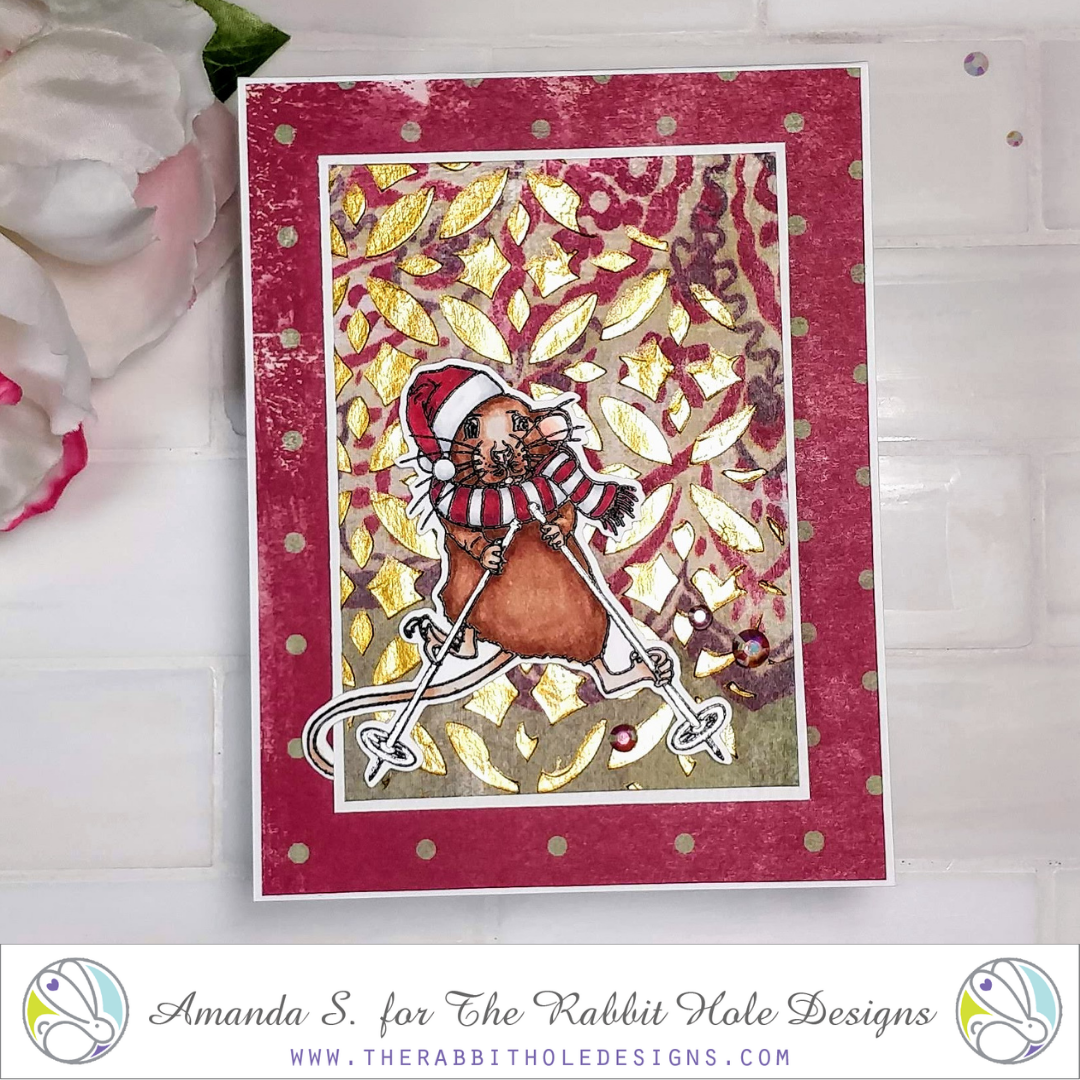
Shimmery Gels
While we are on the subject of pastes, we can’t forget about their shiny gel cousins. You can find glossy gels, glitter gels, transfer gels (for foiling), as well as metallic gels, like the one I used for the sample below. A quick swipe of Metallix through the Diamond Flower stencil, added a beautiful finish to the pattern paper background. On top is a funny little Mouse, all ready for a winter adventure.
Ink Sprays
Even though there are probably a million ways to use your stencils with pattern paper, the last one we are going to cover today is ink sprays. You can mist ink sprays through a stencil to add pizazz to boring prints. Here I sprayed Distress Oxide sprays through the Tattoo Icons stencil to add more interest to my background. It matches the stamped Anchor focal point. Aren’t the clear drop gems a fun touch? They really look like water.
![]()
Thanks so much for joining me today. I hope I’ve inspired you to pull out your pattern paper stash and put it to use! Don’t forget to Pin or bookmark this page so you can find it again later. Did you get a chance to watch the video yet? You’ll be surprised to see how different some of the pattern papers were before I altered them. Would you like to see more stencil inspiration? Hop along with us!
The Rabbit Hole Designs – next stop
Lauren
Jenn
Michelle
Amy
Von Marie
Amanda – you are here

I learned so much from reading your post, and seeing what you meant by looking at the photos. I am going to save this post so I can refer to it later today when I craft. I LOVE to use stencils, but sometimes need new ideas. THANK YOU SO MUCH!!!
Very interesting post! If you have any of the original paper it would be cool to see the side by side difference. I am going to try some of these, I have a TON of pattern paper.
Cool ideas, as usual!!